prettyprint

顯示具有 ZFS 標籤的文章。 顯示所有文章

2022年8月2日 星期二

Integrate FreeBSD NIS and NFS servers for Ubuntu Desktop and FreeBSD Desktop Clients(using ZFS)

本文文章記錄使用FreeBSD 13.1 當作NIS(Network Information System) 和使用ZFS檔案系統的NFS(Network File System) Server提供給FreeBSD或其他Non-FreeBSD系統用戶端使用。

目標:

  1. 建立NIS server,提供區網內(FreeBSD or Non-FreeBSD)帳號驗證與hostname對應。
  2. 用戶端home directory放在NFS server上,達到使用者漫遊目的。
  3. ZFS server提供共同儲存空間,透過ACL控制存取權限,達到分類控管。 
一、安裝過程
實驗架構如下圖

🌱FreeBSD NIS Server:
    FreeBSD  的 NIS 是內建的,因此只要設定啟用即可:
  1. /etc/rc.conf:
    nisdomainname="nis-nfs.local"
    nis_server_enable="YES"
    nis_yppasswdd_enable="YES"
    nis_yppasswdd_flags="-i -u -a"


    說明: nisdomainname可任意設定,但為了讓其他Non-FreeBSD Client,可設定為Internet Domain Name。
    啟用rpc.yppasswd讓使用著可以更改password
    nis_yppasswdd_flags額外設定讓ubuntu client可順利執行yppasswd

  2. 建立NIS maps(NIS 資料庫):

    FreeBSD NIS Client查詢NIS map為/var/yp/nis-nfs.local/master.passwd.byname,Ubuntu NIS Clinet 查詢的是/var/yp/nis-nfs.local/passwd.byname,因此
    FreeBSD NIS server for Non-FreeBSD NIS Client:
    👉/var/yp/Makefile: uncomment UNSECURE = "True", and then 
    執行指令,建立NIS maps:
       建立空的/var/yp/mster.passwd:
               touch /var/yp/master.passwd
               chmod 600 /var/yp/master.passwd
        ypinit -m nis-domainname

    password.byname, password.byid 才會提供加密密碼
    (為提供加密的passwd.byname or password.byid)
    使用pw指令建立NIS user maps
    pw useradd <username> -u uid -c "user name" -d /nfshome/<username> -M 700 -y /var/yp/master.passwd -Y -m  -w yes
    同時建立NIS user與nfs user directory

  3. /etc/hosts: 
    192.168.1.71  nfs   nfs.nis-nfs.local
    192.168.1.72  nis   nis.nis-nfs.local

    其他Clinet即可透過maps中的hosts.byname即可使用此設定
  4. /var/yp/securenets加入可存取限制
    #此行一定樣加入
    127.0.0.1    255.255.255.255
    #其他
    192.168.1.0    255.255.255.0   

🌱詳細步驟可參閱文末影片連結:

🌱FreeBSD NIS Client:
  • /etc/rc.conf:
    nisdomainname="nis-nfs.local"
    nis_client_enable="YES"
  • /etc/master.passwd: 在最後加入
    +:::::::::
  • /etc/group: 在最後加入
    +:*::
🌱Ubuntu NIS Client:
  • 安裝NIS套件:
    sudo apt install ypbind-mt nis
  • /etc/passwd、/etc/group、/etc/shadow、/etc/gshadow等檔案 最後加入一行
    +
  • /etc/nsswitch.conf: 更改加入紅色框部分

  • /etc/hosts: 加入nis hostname
    192.168.1.72   nis   nis.nis-nfs.local
    指加上一行即可,其他可由NIS server /etc/hosts(/var/yp/nis-nfs.local/hosts.byname取的定義
  • /etc/yp.conf加入
    domain nis-nfs.local  server nis.nis-nfs.local
  • 執行ypdomainname設定domainname:
    ypdomainname nis-nfs.local
  • /etc/defaultdomain:
  • nis-nfs.local
  • 執行
    sudo systemctl enable ypbind
    在系統啟用時即啟用NIS client ypbind

🌱FreeBSD NFS Server設定:
✅啟用FreeBSD NFS Server功能:
  1. /etc/rc.conf:
    rpcbind_enable="YES"
    nfs_server_enable="YES"
    mountd_enable="YES"

    rpc_lockd_enable="YES"  # 有些應用程式需要lock
    rpc_statd_enable="YES"

  2. /etc/exports:
    設定分享的目錄,例如: "/usr/src -ro -network 192.168.1.0/24"
    但是以ZFS dataset為NFS share directory時改用設定 zfs set sharenfs property,不用再/etc/exports設定,會自動在/etc/zfs/exports中加入設定。例如,分享兩個dataset,一個做為users的home directory,讓user可在不同機器間漫遊。另外一個dataset作為共用資料夾,並透過ACL設定存取權限。

    zfs set sharenfs="-alldirs -maproot=root -network 192.168.1.0/24" datastor/nfshome

    zfs set sharenfs="alldirs -network 192.168.1.0/24" datastor/sharedir
✅啟用FreeBSD NFS client功能:
  1. /etc/rc.conf:
    nfs_client_enable="YES"

  2. /etc/fstab: 
    192.168.1.71:/datastor/nfshome   /nsfhome   nfs  rw  0  0


    讓系統啟用及mount nfs home directory

✅啟用Ubuntu NFS client功能:
  1. 安裝套件:
    sudo apt install zfs-common

  2. /etc/fstab:
    192.168.1.71:/datastor/nfshome   /nsfhome   nfs  rw  0  0
🏀安裝過程與實際測試展示請觀看下列影片:


2022年5月31日 星期二

ZFS介紹--在FreeBSD與ubuntu環境下實作(ZFS file system introduction and experiment in FreeBSD and ubuntu)

本篇文章著重在FreeBSD與ubuntu下實作ZFS 檔案系統,ZFS理論與優缺點部分不再贅述。

ZFS (Zettabyte file system):

實作上以兩個指令(zpool與zfs)來運作 

  1. zpool: 設定ZFS storage pools
  2. zfs --設定 ZFS datasets

zpool指令: 管理實體儲存設備,形成storage pool

  1. Device: 一個實體儲存設備,例如硬碟等.
  2. Virtual Device(vdev): 一個虛擬設備(vdev)可以是單一個device組成,也可以是多的devices組成mirror, raidz, raidz2, raidz3等主要儲存虛擬設備,也可以當成是hot spare,log等虛擬設備。 
  3. zfs pool: 一個storage pool是由多個vdevs組成,若主要儲存是由多個vdevs組成,則這幾個vdevs在storage pool中是以stripe方式組成。因此若vdev是由單一個device構成,則損換一個device則整個storage pool就會損壞。因此構成storage pool的vdevs一般會採用mirror 或raidz[1-3]較為適合。

zfs指令:管理在storage pool內的dataset

dataset分為:

  1. File system: 能直接掛載在檔案系統中,就像一般檔案系統一樣。
  2. Volume: 是一種block device,可視為是一顆邏輯硬碟,若要掛載在檔案系統中使用,需partition與format後才可mount在檔案系統下。一般直接用來當作iSCSI target的device。
  3. Snapshot: file system或volume特定時間點的快照,一般以 filesystem@name 或 volume@name形式表示。
  4. Bookmark: 像snapshot,但沒有實際保留資料空間。

實機測試:

實際在FreeBSD與ubuntu下,使用12個 20GB虛擬硬碟測試。
包含:
  • ZFS pool硬碟設備故障,如何手動與自動更換故障的設備。
  • ZFS pool在不同作業系統中實體移轉。
  • zfs dataset 的snapshot, rollback, clone
  • zfs dataset在同機器或跨機器間備份與回存(zfs send/zfs receive)
實作過程請參閱以下影片


2022年5月9日 星期一

Raspberry Pi 3 + FreeBSD + ZFS + iSCSI (Part 1)

實驗在Raspberry pi 3 B+上安裝FreeBSD作業系統,啟用ZFS檔案系統,比較ZFS dataset有使用壓縮(Compression)與副本(copies)屬性使用磁碟空間比較。另外建立一個ZFS Volume(Block device)作為iSCSI Target使用。以Windows系統連線iSCSI Target並格式化為NTFS。測試ZFS snapshot, rollback 等功能。 

一、下載Raspberry Pi的FreeBSD OS Image:

從FreeBSD官網下載作業系統映像檔,如下圖所示:

下載檔案:FreeBSD-13.0-RELEASE-arm64-aarch64-RPI.img.xz


二、使用Raspberry Pi Imager安裝作業系統到SD Card上:
  1. 從https://www.raspberrypi.com/software/下載Raspberry Pi Imager:
  2. 安裝FreeBSD Image:
    選用use custom選項,安裝剛剛下載的OS映像檔。

三、設定FreeBSD Static IP, nameserver, 與sshd允許遠端連線:

  1. static IP: 查看網路面卡名稱(ue0),編輯/etc/rc.conf加入
    ipconfig_ue0="inet x.x.x.x netmask x.x.x.x"
    defaultrouter="x.x.x.x"

  2. nameserver:編輯/etc/resolv.conf加入nameserver ip:

  3. sshd:編輯/etc/ssh/sshd_config更改permitRootLogin成yes

四、把外接USB硬碟加入ZFS pool:

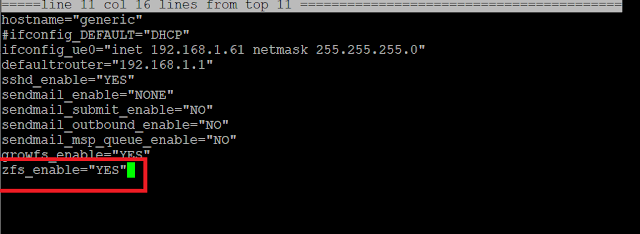
啟用ZFS服務:
  1. 編輯/etc/rc.conf加入zfs_enable="YES"

  2. 執行service zfs start啟用zfs service
  3. 查看外接USB硬碟設備代號(da0),
    執行zpool create storage da0建立名稱為storage的zfs pool。

五、比較zfs dataset具有compression與copies屬性儲存空間的差異

  1. 分別建立storage/normal, storage/compress與storage/data三個filesystem,

  2. 設定storage/compress具有compression屬性
  3. 設定storage/data具有copies=2屬性,可把資料儲存兩份,增加可靠性
  4. 複製相同的資料到這三個檔案系統,查看使用硬碟空間的差異。


    六、建立iSCSI Target,使用Windows iSCSI Initiator 連線成為自己的硬碟

  1. 建立zfs volume(block device)作為iSCSI Target設備 zfs create -V 25G storage/iscsi01
  2. 編輯/etc/ctl.conf
    更改etc.conf權限,chmod 644 /etc/ctl.conf
    編輯/etc/rc.conf加入ctld_enable="YES"
    啟用service ctld start

  3. 啟用Windows iSCSI Initiator 連線iSCSI Target

  4. 使用Windoes disk managment格式化iSCSI 硬碟

七、zfs snapshot與rollback展示: